SKU: DT-KHG-TCT-2

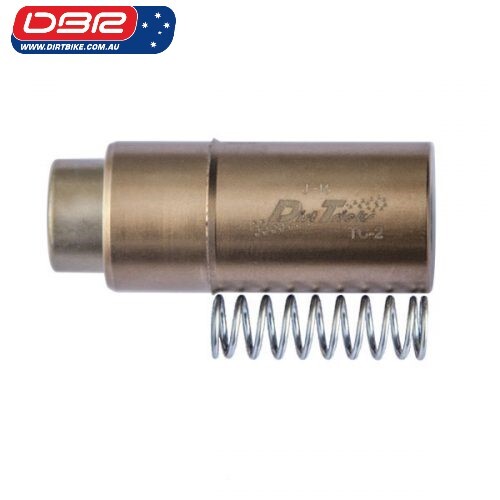
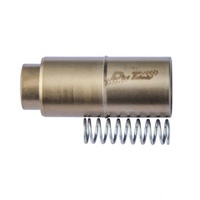
Dirt Tricks Australia Automatic KTM Timing Cam Chain Tensioner Fits: KTM 350 (11->C), 250 SXF (13->C), 250 EXC/XCF (14->C). Husqvarna 250/350 FC

KTM Husqvarna Gas Gas 250 / 350 Fourstrokes.

$229.00
This item is a stocked item. That is we aim to keep it in stock in Australia ready for shipping. Your welcome to call to discuss is it currently in stock and or when we are about to take deliver of more. 02 4872 4222 Thanks.


Calculate Shipping


Australia Post - $13.00
Express Post
Standard Shipping Toll - $17.00

Fits: KTM 350 All 11->C, KTM 250 SXF 13->C, KTM 250 EXC/XCF 14->C.

Description

Automatic KTM Husky Timing Chain Tensioner TCT-2 

- If you have a "ticking" noise at idle, on your newer four-stroke, you need this part.  Resolves issues with a slack timing chain on the new four-stroke motors.

- Uses oil pressure combined with a mechanical ratchet system to prevent collapse.

-

The 2008 and newer four-stroke KTMs (and some earlier SX models) use a timing chain tensioning device intended to develop its force using the engine oil pressure hydraulically.

The OEM components have serious flaws (reviewed below), which can leave the timing chain in a slack condition.  This can have disastrous consequences.  Dirt Tricks has developed a simple, effective and failsafe replacement.  The new tensioner correctly captures the oil pressure.  Additionally, it uses a positive mechanical ratcheting system which prevents it from collapsing.  With very satisfying test results from our race bikes, we have completed CNC production of the new tensioner.  They can be installed in less than five minutes.

As the spring is inserted and you compress it, you can feel and hear the clicks as the piston ratchets into position.  There are a total of 11 ratchet positions at 1mm spacing.  If you extend to more than 9 clicks, you probably need to replace your timing chain.

Automatic KTM Husky Timing Chain Tensioner TCT-2 Fits:

KTM :

350 11-> Current,

250 SXF 13-> Current,

250 EXC/XCF/ 14-> Current 

Husqvarna :

250 FC/FE 14-> Current

350 FC/FE 14-> Current

Gas Gas :

250 ECF 21-> Current

350 ECF 21-> Current

250 MCF 21-> Current

350 MCF 21-> Current


Below is an overview of the OEM design verses the Dirt Tricks design.

Chain Tensioner Installation Instructions

REMOVE OEM CHAIN TENSIONER
1. On some models including the 250/350 motors, it is necessary to put the engine at TDC before proceeding. Check your owner’s manual.
2. Remove the outer Cover Plug and Small O-Ring.
3. Remove the large Cover Bolt with Copper Washer. (Note: It is recommended to pay attention to the direction of the Copper Washer to ensure it is replaced the same way. This will help it reseal).
4. Using a magnet (or being very careful with pliers). Grab the end of the OEM Tensioner and pull it outward. Be careful not to damage the aluminum port or face.
5. If the O-Ring did not come out with the OEM Tensioner, carefully reach into the port and remove it without pushing it further into the engine. You will need to reuse this O-Ring with the DT Tensioner.


INSTALL DIRT TRICKS CHAIN TENSIONER
1. To prepare the DT Tensioner, set the spring aside, and make sure it is in the collapsed position. If the piston is extended, gravity will usually return it to fully collapsed by pointing it upward. If it has locked into place, keep the piston facing up and lightly tap the bottom to release the ratchet. This will now allow the piston to be retracted to about 1-13/16” (46mm) which is fully collapsed.
2. Install the O-Ring over the outward side of the DT Tensioner body, keeping it outboard of the ridge.
3. Slide the fully collapsed DT Tensioner assembly with O-Ring (without the spring), into the Engine Port. The end (with the Hex-Head Spring Hole) should only protrude from the engine about 1/32” (.75mm). This measurement will be greater if installing part number TC-2 in a 350 motor.
4. Install the Cover Bolt and tighten. The Copper Washer should be tight.
5. Insert the spring through the hole in the Cover Bolt. As it is slowly inserted, you may hear clicks as it pushes the plunger forward.
6. Install and tighten the Plug against the Spring. (Note: some 250 engines have a one piece cap. Slide the Spring into the DT Tensioner just far enough to hold it, then capture it with the cap and tighten).
7. Start the engine and carefully check for oil leaks. Adjustment will occur internally as it is needed. No further maintenance of the DT Tensioner is required.

Husaberg requires special attention during installation. The Tensioner rests vertical on the Husaberg. Since gravity will extend this part, you must find a way to ensure it remains collapsed. You need to orientate the Tensioner Port in a horizontal position to allow installation in the collapsed position. Laying the bike over on its side should work. It may be helpful to place something under your wheels as well. The goal is to orientate the Tensioner Port horizontal to the ground so the Tensioner will remain collapsed during installation.

PLEASE READ BEFORE INSTALLATION
Do not install on a brand new motor. Installation of the Dirt Tricks Tensioner should only occur after a minimum break in period of approximately 20 hours on a brand new motor. This is also true for some newer model KTMs using part TCT. A modification to the OEM Tensioner has been made; it will collapse nearly flush within itself. In this fully collapsed position, the OEM Tensioner is shorter than the DT Tensioner. If you perform the install on a brand new motor, the extra length may apply too much tension to your timing chain guide. This may produce premature wear to your guide.

How do you know that you have put enough time on your motor for a safe install? The 20 hour mark we have established should be more than plenty, but you can compare the two side by side as well. Remove the OEM Tensioner from your motor and compare the overall length from the last running position with the collapsed DT Tensioner. If it is equal to, or longer than the fully collapsed DT Tensioner you are safe to perform the installation. Once you achieve 20 hours, installation should be safe for any model. To access the Tensioner on some models, you will most likely need to remove your lower right side Radiator Hose. This will allow just enough room to perform the installation.

Note: All model 250/350’s run the risk of jumping time from the removal of the OEM Tensioner. Setting your motor to TDC and using the OEM crank locating screw before you begin installation will prevent this and is highly recommended. Follow the procedure in your owner’s manual or consult your local KTM shop for help. It is also recommended to verify your motor is on time before and after installation

Note 2: On models 690cc’s or bigger.
If our tensioner is not fitting in your bike by not allowing your OEM cap to fully thread into your cylinder. Then your bike may be equipped with a “spyder washer” inside your OEM cap. On various different models 690cc’s or bigger sometimes the removal of this “spyder washer” in your OEM cap will be required in order to use our tensioner.


Specifications

SKU DT-KHG-TCT-2
Brand Dirt Tricks
Shipping Weight 0.2000kg
Shipping Width 0.100m
Shipping Height 0.050m
Shipping Length 0.100m

Reviews

Be The First To Review This Product!

Help other Dirt Bike users shop smarter by writing reviews for products you have purchased.

Write a product review


Others Also Bought


More From This Category